Share it

Bookmark and Share

Translate

Showing posts with label Wordpress. Show all posts

Monday, July 2, 2012

8 Free WordPress themes


1. Twenty Eleven
twentyeleven.png
The 2011 theme for WordPress is sophisticated, lightweight, and adaptable. Make it yours with a custom menu, header image, and background — then go further withavailable theme options for light or dark color scheme, custom link colors, and three layout choices. Twenty Eleven comes equipped with a Showcase page template that transforms your front page into a showcase to show off your best content, widget support galore (sidebar, three footer areas, and a Showcase page widget area), and a custom “Ephemera” widget to display your Aside, Link, Quote, or Status posts. Included are styles for print and for the admin editor, support for featured images (as custom header images on posts and pages and as large images on featured “sticky” posts), and special styles for six different post formats.
2. Twenty Ten
twentyten.png
The 2010 theme for WordPress is stylish, customizable, simple, and readable — make it yours with a custom menu, header image, and background. Twenty Ten supports six widgetized areas (two in the sidebar, four in the footer) and featured images (thumbnails for gallery posts and custom header images for posts and pages). It includes stylesheets for print and the admin Visual Editor, special styles for posts in the “Asides” and “Gallery” categories, and has an optional one-column page template that removes the sidebar.
3. Responsive
responsive.JPG
Responsive WordPress Theme that features 9 page Templates such as Blog, Blog Summary and Template based layout designs: sidebar/content, sidebar/content half, content/sidebar and content/sidebar half. There is also full width page, sitemap Template as well as landing page for your PPC or any other purposes. Responsive also supports 9 widget areas and best of all this Theme is crafted with fluid proportion-based grid system of our own to adapt the design to the viewing environment. There are also Theme Options to control the content, webmaster tools, logo managament, social icons and 4 navigation menus.
4. PageLines
pagelines.png
A responsive drag-and-drop platform for professional websites based on HTML5 and CSS3. PageLines has multiple template areas for every aspect of your site including blog, category, and archive views. Also supports multiple widgets in a variety of different sidebar configurations, as well as special handling for forums and ecommerce. PageLines will help you do amazing things faster & easier than ever before.
Download PageLines
See Demo of PageLines
Click Read more to see more Details.....

Tuesday, March 29, 2011

0 How to edit a wordpress Theme...

The process
Go over the files of the WordPress theme you want to edit and study how it controls your blog’s appearance. Take note of how the pages, index.php (for the main page) and single.php (for individual blog posts), call the different template files.
The header is called first. What is called next depends on the WordPress theme you are using: some call the main content next then the sidebar then the footer. Other themes call the sidebar first then the main content and then the footer.
Create a new folder and copy into it 1.) the style.css of the WordPress theme you want to edit, and 2.) the folder containing the images.
Create a new HTML document in Dreamweaver and save it into the folder you’ve just created. Go to Code View and paste into it these lines:
<!-- Header part goes here --> <!-- /Header part ends here --> <!-- Main content here --> <!-- /Main content ends here --> <!-- Sidebar content here --> <!-- /Sidebar content ends here --> <!-- Footer content here --> <!-- /Footer content ends here -->
The lines are code comments to guide you as you copy code from the different PHP files for editing and transfer these back again after you’ve finished customizing the design. Just re-arrange the lines if the WordPress theme you want to customize calls, for example, the sidebar before the main content. (click on photos to view larger images)
Copy codes
DreamweaverStart copying codes from the different template files: the header.php, sidebar.php and footer.php. For the main content, copy the code that displays your blog content in index.php. The first thing you need to change is the location of the CSS file in the header. WordPress themes point to the CSS file using the line:
<link rel="stylesheet" type="text/css" media="screen" href="<?php bloginfo('stylesheet_url'); ?>" />
Just change <?php bloginfo('stylesheet_url'); ?> to style.css so that your document can locate the stylesheet.
After that, change the dynamic calls for such things as your blog name and sub-title and add dummy headlines and article text.
Most WordPress themes that display the blog title as text have the following code: <h1><a href="<?php echo get_settings('home'); ?>/"><?php bloginfo('name'); ?></a></h1>
What this does is display your blog name and link it to your main page. To view how the blog name is rendered, just delete <?php bloginfo('name'); ?> and type in your blog name. Do the same thing for the blog tagline or subhead, which is displayed by the code <?php bloginfo('description'); ?>.
Dummy content
In the main content, just delete the conditional statements found in index.php and retain only the code that displays the blog post.
Delete these lines:
<?php if (have_posts()) :? > <?php while (have_posts()) : the_post();?> <?php endwhile; ?> <?php else : ?> <h2>Not Found</h2> <div>Sorry, but you are looking for something that isn't here.</div> <?php endif; ?> </div>
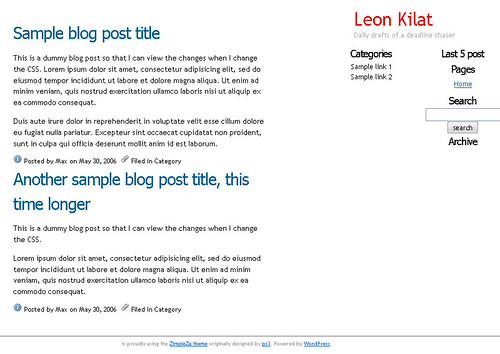
Place some dummy headlines and text to preview changes you might want to do with the stylesheet or the HTML code. The blog post headline is called by <?php the_title(); ?>, just delete this and type in a dummy headline. To enter dummy text for the blog post article body, replace <?php the_content('Read the rest of this entry &raquo;'); ?> with some dummy text. Enter dummy links and headlines in your sidebar. Editing with Dreamweaver
After you enter the dummy text, you now have a mock up design of your WordPress theme that you can use as base for customization. With this, you can instantly preview results of changes in the CSS or HTML codes. After you’ve finalized the design, copy the new codes to the different template files and save the CSS. Go over the codes again and replace the dummy text you placed with the appropriate WordPress template tags for the blog title, blog post headline and content.
To tweak your WordPress theme even further, you might want to check my repository of pieces of great WordPress theme codes, feel free to suggest snippets that should be added there. I still have to finish the second part of my article: How to create a WordPress theme: A guide for the design-challenged non-geek. I’m thinking of finishing part 2 by next week (fingers crossed).
 

TechnoTipworld- Tips,Tricks,Technology Copyright © 2011 - |- Template created by O Pregador - |- Powered by Blogger Templates